Relieve Stress Headaches Naturally

What Causes Stress Headaches?

Stress is an unfortunate byproduct of the festivities of the holiday season. The holidays are supposed to be fun. But you are adding all the festive gatherings, Christmas shopping, and family drama to an already crowded schedule.

Then the New Year comes. This should be a time you can relax. But no, the holiday bills start rolling in, and you have the stress of figuring out how to pay them. Then, there are New Year’s resolutions. You know you should be making resolutions, but you also know you’ve never successfully kept them in the past. Now, that is real stress.


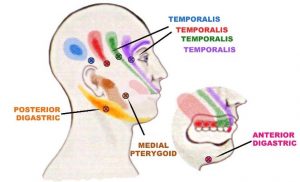
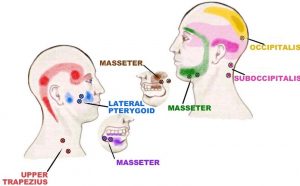
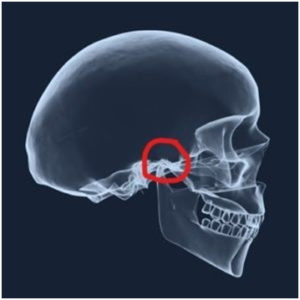
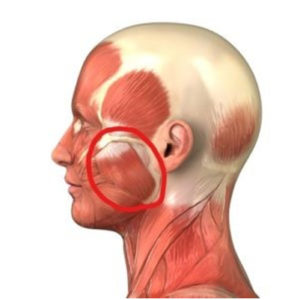
That stress often shows up as tight muscles and muscle spasms that can cause headache pain. If you already have one of my books, especially either Treat Yourself to Pain-Free Living, or The Pain-Free Athlete, you have the tools necessary to get relief.  You can look at the colorful charts and find the area where you are feeling pain or stiffness. Then look for the muscle name that is in the same color as the shaded area of your discomfort. Then, follow the arrow and it will bring you directly to the spasm(s) that cause the pain. The figures above show some of the muscles that can cause headache pain when stress causes them to get tight and spasm.

Relief From Stress Headaches

As you see in the charts above there are multiple places where spasms will cause headaches.  Actually, there are a lot more than this, but that’s why I wrote my “Pain-Free Living” book. It’s just too much for a newsletter.

Each of the spasms noted in these two charts can be treated by applying direct pressure onto the spasm and then holding it for 15-30 seconds.  Use as much pressure as you can, but it must always be in the tolerable range, this is NOT a “no pain-no gain” situation.  It is going to hurt because you are forcing toxins out of the muscle fibers, and the toxin is an acid (from lactic acid) so it burns. However, you’ll find that as you continue holding the pressure it will lessen.

After 30 seconds, keep your fingers in the same place but take off the pressure. Wait for 5 seconds and then re-apply the pressure.  It won’t hurt as much this time because blood has filled the void and it’s already starting to heal the muscle.

Keep doing this until you don’t feel pain anymore, and then look for another point.  I call these points “hot spots” because that’s exactly what they remind me of.

Feel around your head, your neck, and your shoulders and apply pressure on each painful point.  You’ll be pleased when you feel the results! If it’s stress related, your headache pain will be gone.

Frozen Shoulder Treatment

Regain a Full Range Of Motion

Author: Julie Donnelly, LMT –The Pain Relief Expert

Editor: Dr. Steve Chaney


May Is A Beautiful Time Of Year

It’s MAY!!   Bring on the flowers that came from the April showers!

Of course, here in Florida we have flowers all year, so it’s our friends to the north that are enjoying a glorious array of color during this month.

In some ways, life is beginning to slow down for us.  With most of the snowbirds gone, driving is easier, the stores are less crowded, and we can park at the beach.  The weather is still beautiful so we can still go outside to ride a bike, jog, or play the sports we enjoy. This leads me to talk about a new client who came in and needed frozen shoulder treatment.


What Is A Frozen Shoulder?

There are 15 muscles that insert into your shoulder, each pulling your arm in a different direction.  The term “Frozen Shoulder” is used when a muscle gets so tight that it’s difficult, or impossible to move in the opposite direction.  Since there are 15 muscles pulling your shoulder and arm, the possibility of several of them going into spasm and preventing your arm from moving is huge. In fact, it’s pretty amazing that it doesn’t happen more often!

Depending on how many muscles are involved, frozen shoulder can range from a minor inconvenience to the inability to move in any direction at all.


Pain Can Restrict Motion

Recently, a new client, Claire, came into my office with a frozen shoulder. Claire could only lift her arm to a point where it was horizontal to her shoulder, and she couldn’t bring it backward at all.  She was in a lot of pain and nothing she tried had worked. Fortunately, I am an expert at teaching people how to treat frozen shoulders and regain a full range of motion.

I first learned how to treat a frozen shoulder when it happened to me in 1994.  Every one of the muscles of my left shoulder went into a serious spasm/contraction at the same time. I couldn’t move my elbow more than 2” away from my waistline!  The pain was excruciating!  I went to every type of practitioner I could imagine: massage (of course), physical therapy, orthopedic physician, chiropractor…in fact I would have gone to a witch doctor if I could have found one.  Nothing was working!

Finally, I decided I needed to figure out how to self-treat the muscles that I knew were knotted up and holding my shoulder and arm bound.  It took me from September until February to work it out and get my arm back to 100% range-of-motion, but I did it.  I was thrilled, and I knew I had to teach this to everyone who has any shoulder pain. If you have my book, Treat Yourself to Pain-Free Living, every shoulder treatment in that book came from my journey through pain.  I know they all work!

So, back to my new client.  When I saw the movements Claire couldn’t make, I knew that the muscles in the front of her shoulder were pulling her arm forward, and her latissimus dorsi muscle was pulling her arm down. As a result, she couldn’t lift her arm or bring it back.


Frozen Shoulder Treatment

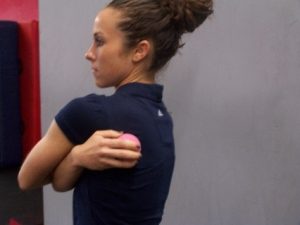
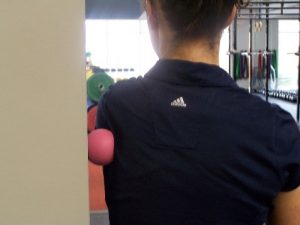
The next three pictures show you how to treat two of the most common muscles that cause shoulder pain.  These are the muscles that were giving Claire so much trouble when she needed frozen shoulder treatment. You’ll be using the Perfect Ball so you can really get to the muscles that are deep in the joint.

If you are having trouble lifting your arm up, put the Perfect Ball into your opposite hand and following the picture, place it onto your shoulder blade.  You need to move it so it’s on the part of the bone that is the back part of your armpit.

Move your body around until you hit a really tender point. That’s the spasm in the latissimus dorsi that is preventing you from lifting your arm up.

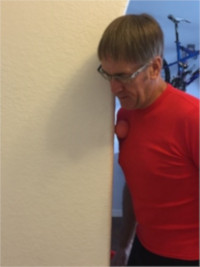
To treat the muscles (pectoralis minor and pectoralis major) that are preventing your arm from going back, you need to lean into the corner of a wall.

As the picture demonstrates, put the Perfect Ball onto the front of your shoulder and lean into a wall.  You can move the ball up and down by bending your knees a bit.

If in either frozen shoulder treatment you want more pressure, move your feet further out from the wall.  For less pressure have your feet closer to the wall.

Why stay in pain when it’s so easy to find the muscular source of the problem and eliminate it?

Treat Yourself to Pain-Free Living . It is filled with over 100 pictures and descriptions proven to show you how to find and self-treat muscle spasms from head to foot!

Join the 1000’s of people worldwide who have discovered that tight muscles were the true source of pains they thought were from arthritis, fibromyalgia, and other serious conditions.  You have nothing to lose, and everything to gain by releasing tight muscles.

Treat Yourself to Pain-Free Living is your step-by-step guide to pain relief!


Wishing you well,


Julie Donnelly

Julie Donnelly

These statements have not been evaluated by the Food and Drug Administration. This information is not intended to diagnose, treat, cure or prevent any disease.


About The Author

Julie Donnelly is a Deep Muscle Massage Therapist with 20 years of experience specializing in the treatment of chronic joint pain and sports injuries. She has worked extensively with elite athletes and patients who have been unsuccessful at finding relief through the more conventional therapies.

Calf Cramps Remedy

Don’t Let A Leg Cramp Stop You Short

Author: Julie Donnelly, LMT – The Pain Relief Expert

Editor: Dr. Steve Chaney
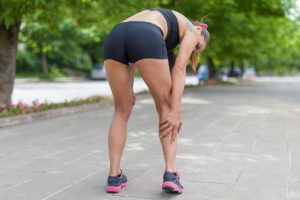
 

calf cramps remedyGetting a leg cramp while you are running can be the “straw that broke the camel’s back.”  If you don’t treat it properly and quickly when it is happening, you may limp to the finish line, and you can suffer from its effects for days afterward.  I will show you the best calf cramps remedy below.  First, let’s go over spasms and muscle cramps.

A spasm and a cramp are similar because it’s a shortening in the muscle fiber, but that’s where the similarity ends. A spasm is a slow-forming shortening of a group of fibers that tie up into a knot in the muscle. You can feel a spasm with your fingertips, it feels like a bump as you slide along the full length of the muscle. With a spasm, as you press down and slide, it doesn’t hurt until you get to the spasm, and then it can really hurt. But then it stops hurting as you slide off the spasm. A spasm refers pain to the insertion points of the muscle and frequently doesn’t hurt where the spasm has formed (that is, until you press on it).

Why Do Your Muscles Cramp?
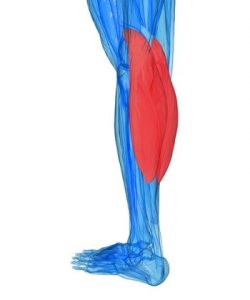
calf cramps remedy muscle crampsA cramp (Charlie horse) is when all the fibers of the entire muscle suddenly and violently contract. The muscle will quickly shorten and can go into a huge knot, or it will just totally shorten.

Usually a cramp happens in your calf muscle, although it can happen to any muscle in the body.  Your calf is comprised of two major muscles, the gastrocnemius and soleus. The gastrocnemius, which is shown in this graphic, originates behind your knee and inserts into your Achilles tendon.

Visualize the muscle suddenly shortening, pulling up on your Achilles tendon, and becoming a mass of tight knots through the entire muscle.

Muscles have an “all or nothing” response.  This means that when a muscle fiber contracts, it will shorten 100% of its length.  It never starts to shorten and then make a U-turn and lengthen.  A cramp is seriously painful, and if you try to stretch it out as it’s happening, you can tear the muscle fibers. In fact, that’s the reason it hurts for sometimes days after the cramp.

A Calf Cramps Remedy You Can Administer Yourself
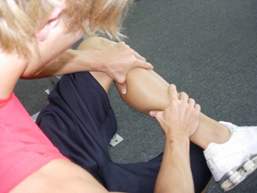
calf cramps remedy squeezeThe best thing to do is to squeeze the two ends of your calf muscle together, which will help the cramp complete as quickly as possible. This will hurt, but for less time than the normal cramping process.  Hold your calf tightly, as shown in this picture, and continue to press the two ends toward each other.

Hold it until you can breathe normally (about 30-45 seconds), and then release. Breathe for a minute or so, and then push the two ends together again.  This second time won’t hurt, you are only doing it to make sure that all the fibers have completed the contraction.
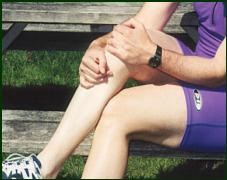
calf cramps remedy hold sittingOnce you have stopped the cramp, don’t stretch…yet. You need to flush out the hydrogen ions (AKA lactic acid) that rapidly built-up in the muscle during the cramp.

There are many ways to self-treat your calf. If you are out on the road you can either sit on a bench or lie on the ground and put the sore calf onto your opposite knee.  Press down and hold the pressure for 30 seconds. Then deeply press along the muscle going from the back of your knee toward your ankle.
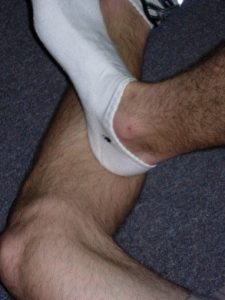
calf cramps remedy opposite footYou can also use your opposite heel and press deeply, straight into your calf.

Start at the top of the muscle and move down toward your ankle. Stop whenever you come to a point that is especially painful. The point should be close to the area shown in this picture.

Hold the pressure for 30-60 seconds, or until it doesn’t hurt anymore.  Release, and then repeat 2-3 times.

Complete this self-treatment by squeezing your calf muscle, like you are wringing out a wet towel.  This will force blood into your muscle and get your circulation moving again.

Proof That My Treatments Work

I once taught this technique at an Ironman Triathlon during a 15-minute session I was giving to the triathletes.  Several days later a triathlete emailed me and told me that he had a cramp as he was running, and he did the treatment I’d taught him.  It cost him a few minutes (he wasn’t in the top three, so the time loss wasn’t a huge issue) but he was able to get up and get back to running, totally without pain.

About a mile later he got a cramp in the other leg, but he automatically started to just stretch it like he’d always done before.  He ended up limping all the way to the finish line, and days later it was still hurting.  He wanted to let me know that my cramp treatment really worked great.  This was especially helpful because I’d always wondered what body chemistry did to the outcome of treating a cramp, and here I found out that chemistry wasn’t involved in the treatment of the muscle fibers.

What To Do After The Calf Cramps Remedy

If the cramp happens during a race or athletic event, knowing how to stop it, and these quick massage techniques, will get you back into the game. But it hasn’t totally resolved the issue. Finally, when you have the time to be detailed (after the race, in the evening, etc.), it is important to work out all the spasms and then stretch properly.

When you are treating the muscles afterward, I suggest you consider getting an analgesic cream that goes way deep into the muscle fibers. Use it when you are massaging the muscle, but don’t put it on before you play, run, or before/after a shower because it will go too deep into the muscle and burn like crazy. After you do the treatments, use ice &/or arnica gel (get it at a good health food store) to heal the bruised muscle fibers and help with pain and swelling. Arnica is fantastic, it’s an amazing homeopathic remedy that has been around for ages and really works.

Naturally you will also want to make sure you hydrate properly and that your diet, vitamins and minerals are all in balance.
calf cramps remedy bookCramping is a common problem athletes face, but with a little bit of effort you can prevent muscle injury and get back in the race quickly!

You can find the full treatments for your muscle cramps by going to my book, Treat Yourself to Pain-Free Living . This book has treatments for your entire body, from your head to your feet.  YOU are your own Best Therapist!  Stop pain quickly and easily with self-treatments you can do anytime, anyplace.

Wishing you well,

Julie Donnelly

julie donnelly

About The Author

Julie Donnelly is a Deep Muscle Massage Therapist with 20 years of experience specializing in the treatment of chronic joint pain and sports injuries. She has worked extensively with elite athletes and patients who have been unsuccessful at finding relief through the more conventional therapies.

She has been widely published, both on – and off – line, in magazines, newsletters, and newspapers around the country. She is also often chosen to speak at national conventions, medical schools, and health facilities nationwide.


These statements have not been evaluated by the Food and Drug Administration. This information is not intended to diagnose, treat, cure or prevent any disease.
TMJ Pain Relief

TMJ Treatment Can Relieve Stress & Pain

Author: Julie Donnelly, LMT –The Pain Relief Expert

Editor: Dr. Steve Chaney

tmj pain reliefTMJ is the common term for a jaw condition called temporomandibular joint dysfunction. The muscle that is key to the TMJ pain relief treatment described below is the masseter muscle.  The holiday season is “famous” for increasing stress as we rush around, adding more “to do’s” to our lives. Aside from the usual work and family commitments, the holiday’s mean extra shopping, parties, and therefore, stress.

TMJ Symptoms

Common symptoms of TMJ are:

  • Jaw Pain
  • Clicking when opening your mouth
  • Clicking while chewing
  • Jaw moving toward one side
  • Ear pain
  • Trouble opening mouth fully

While there are other pains that are common with TMJ, these are the most prevalent.

A Common Cause of TMJ Disorder

tmj pain relief muscleDo you find yourself clenching your teeth? Do you chew gum?  These are two of the most common causes of TMJ.

Your masseter muscle is a small, but powerful muscle that goes from above your back teeth, to your jaw.

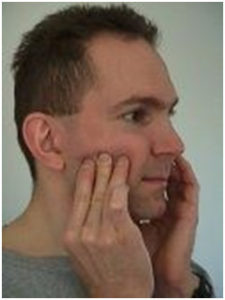
You can feel it if you put your flat fingers on the back of your cheek and clench your teeth.

Your masseter is used when you chew.  As you hold your fingers on your masseter muscle, clench and open your jaw repeatedly. Like any other muscle in the body, it can be subject to repetitive strain injury. Normally you open your mouth wide to put in food, and then chew. This motion both contracts and lengthens the muscle.

However, if you chew gum you are contracting (shortening) the muscle, but not lengthening it. And it stays contracted if you clench your teeth when you are stressed, or at night while you sleep.  Eventually the muscle will form spasms from the repetitive movement.

It is called TMJ because of the joint the masseter crosses over at the very back of your jaw. The problem is the way your movable jaw attaches to your skull. As the muscle tightens into the spasm, it prevents your jaw from opening properly.  When one side is tighter than the other, your jaw will move toward the tighter side. As this happens the bones click over each other and you will feel pain.

TMJ Treatment Saved This Woman From a Lifetime of Drooling!

pain freeSeveral years ago a woman came to the medical office where I had my therapy practice. Both sides of her jaw were so tight that she couldn’t open her mouth at all. She had to “eat” liquefied food through a straw and her fear was if she regurgitated, she could choke.  The next day her oral surgeon planned on severing both masseter muscles. This surgery meant her mouth would hang open permanently. This would result in her drooling for the rest of her life! What a nightmare!

Her masseter muscles felt like rocks had been stuffed into her cheeks. The medical doctor who owned the office understood repetitive strains and wouldn’t give her surgical clearance until she saw me. I taught her the following TMJ treatment, and in just 15 minutes she was opening and closing her mouth normally.

First, I worked on her muscles, then I taught her how to do it. The TMJ pain relief treatment starts with first pressing the muscles as described below, holding the pressure, and then releasing it. She did this several times, alternating between her right and left sides. The last part of the TMJ treatment is applying pressure to both sides at the same time. Then while still holding the pressure, I told her to just open her mouth slowly and she did.  Without pain!

She started to cry because she was only one day away from a lifetime of drooling. And the best part is it only took 15 minutes to solve.

TMJ Pain Relief Treatment

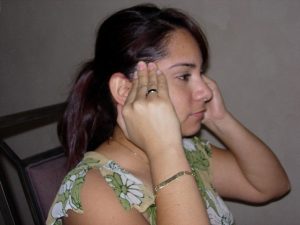
tmj pain relief treatmentTo begin the TMJ pain relief treatment, place the length of your three middle fingers on both jaws.  Clench your teeth so you can feel the muscle bulge under your fingers.

Press deeply on just one side, feeling for the “knot” in the muscle. Press in for the count of five, and hold it for the count of five.  Then slowly release that side and repeat it on the opposite side of your jaw. Go back and forth, repeating this several times.

Feel along the muscle and find other knots and repeat the sequence. Do this to each spasm you find.

Go to the point just in front of your ear lobe and press.  If it hurts, there is a spasm. Do the same treatment. This is a small area so you’ll probably only need one finger to be effective.

After you are finished treating each spasm, put your fingers on both masseter muscles at the same time. Now, slowly open your mouth to stretch the muscles.

That’s it!  It’s easy to apply this TMJ pain relief treatment when you know where to go and what to do.

Treat Yourself To Pain Free Living  has the TMJ treatment and also has treatments for your entire body.  You don’t need to be in pain when it’s so easy to find solutions you can do yourself.

Discover the secret of why you hurt and how to stop the pain FAST!

Wishing you well,

Julie Donnelly


About The Author

julie donnellyJulie Donnelly is a Deep Muscle Massage Therapist with 20 years of experience specializing in the treatment of chronic joint pain and sports injuries. She has worked extensively with elite athletes and patients who have been unsuccessful at finding relief through the more conventional therapies.

She has been widely published, both on – and off – line, in magazines, newsletters, and newspapers around the country. She is also often chosen to speak at national conventions, medical schools, and health facilities nationwide.

These statements have not been evaluated by the Food and Drug Administration. This information is not intended to diagnose, treat, cure or prevent any disease.

Pain Behind The Knee Relief

Is Surgery The Only Option?

Author: Julie Donnelly, LMT –The Pain Relief Expert

Editor: Dr. Steve Chaney

pain behind the kneeRecently I was speaking at a convention and a woman came to me complaining of back of knee pain that was sharp each time she stood up.  She had been told she needed knee surgery, but this was a solution she didn’t want to entertain. Her job has her sitting in one position for hours, and when I felt the back of her knee I found a small point that caused her a great deal of pain.  She needed pain behind the knee relief.

What Causes Pain Behind The Knee After Sitting?

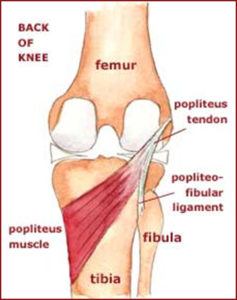
Pain behind the knee can be caused by a small muscle called “Popliteus.” The popliteus muscle originates on the posterior side of the tibia (shin bone) and inserts into the posterior femur (thigh bone).  When it contracts (shortens) it causes your knee joint to bend.  The nickname is “the key that unlocks the knee.” If your popliteus doesn’t contract, you can’t bend your knee.

Why A Muscle Can Cause Pain Behind The Knee

The problem is caused by the muscle being held contracted for an extended period of time.  Muscle memory is a phenomenon that causes a muscle to stay in the shortened length after it has been held contracted for a long time. For example, in this case when your knee has been bent while you drive your car or sit at your desk, could cause pain behind the knee.

When you go to stand up the popliteus has shortened due to muscle memory and it won’t lengthen. You now have stiffness and back of knee pain because the muscle and tendon are pulling hard on the bones. Often a person will tell me that the pain feels like it’s “deep inside my knee joint.” It is deep inside your knee joint.

So, you sit down again, and the pain at the back of your knee stops hurting. However, it’s only not hurting because you have brought the two bones closer together so the pressure has stopped.  It’s only making the matter worse in the long run.

BTW, this is what is happening all over your body. As a muscle gets tight because of spasms or shortened fibers, it is pulling hard on the tendon attachment at the insertion point.  If you try to stretch the muscle without first releasing the tension, you are placing a greater strain on the joint where the tendon is attached.

So, what to do?

Releasing The Tension Can Relieve Pain Behind The Knee

I’ve always explained that applying steady pressure to the spasm (also called a “trigger point”) will release the tension and allow the muscle to stretch normally.  As you hold the point it will become less and less painful, and soon it won’t hurt anymore. After the pain is gone you can safely stretch the muscle without tearing the fibers.  This will release the tension and begin to relieve pain behind the knee.

Now it’s important to drink a lot of water after the treatment.  If your muscle feels a bit sore you can use either ice (wrapped in a cloth) or arnica gel (a wonderful homeopathic remedy). Ice &/or arnica will heal the bruising caused by the knotted muscle fibers.

Treating The Muscle That Causes Pain Behind The Knee

pain behind the knee treatmentI’ve written several self-treatment books and filmed unique self-treatment DVD programs, through the years. I’m happy to share this simple treatment that I demonstrate in my book, Treat Yourself To Pain-Free Living.

Put your foot onto a stool or chair. Bend your knee and wrap your hands around your knee joint.  Have your middle fingers press directly into the area behind your knee joint and put your thumbs on your kneecap. You are using your thumbs as leverage and pressing into the muscles with your middle fingers.  Move around an inch in any direction until you find the tender point and then maintain the pressure for at least 60 seconds.

You can also sit on the floor or your bed with your foot flat and your knee bent.  Press up into the back of your knee, feeling for the painful tender point.  Hold the pressure for 30-60 seconds.

End the treatment by slowly straightening your leg while you are still maintaining the pressure. You can repeat this movement 2-3 times.

It only took a few minutes of sustained pressure on the trigger point and the lady I mentioned above was out of pain!  I had her press on the muscle, and she didn’t feel any discomfort.  I checked again, and the pain behind the knee was gone.  Imagine, only a few minutes and she avoided the possibility of knee surgery.  She was thrilled!

It is always beneficial to check the muscles for spasms before you have non-life threatening surgery. Many times the pain can easily be eliminated by simply releasing the spasms that are putting pressure on the insertion point at the joint.

Wishing you well,

Julie Donnelly


About The Author

julie donnellyJulie Donnelly is a Deep Muscle Massage Therapist with 20 years of experience specializing in the treatment of chronic joint pain and sports injuries. She has worked extensively with elite athletes and patients who have been unsuccessful at finding relief through the more conventional therapies.

She has been widely published, both on – and off – line, in magazines, newsletters, and newspapers around the country. She is also often chosen to speak at national conventions, medical schools, and health facilities nationwide.

These statements have not been evaluated by the Food and Drug Administration. This information is not intended to diagnose, treat, cure or prevent any disease.

Side Stitch Pain Relief

What Is Side Stitch Pain And How Do You Treat It?

Author: Julie Donnelly, LMT –The Pain Relief Expert

Editor: Dr. Steve Chaney

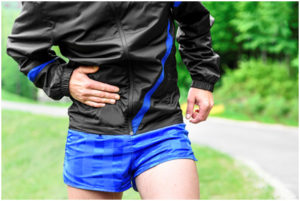
side stitch painSide stitch pain feels like a pin is being pushed into the muscle between your ribs – and it hurts!  In fact, it’s enough to make you stop running if you’re out exercising. Or you’ll take very shallow breaths if you are suddenly attacked by a side stitch pain.

What Causes Side Stitch Pain?

The most common cause of side stitch pain is a spasm in your intercostal muscles , the tiny muscles that attach your ribs together.

When you take a breath in, your external intercostal muscles contract to make your rib cage expand, and your internal intercostal muscles contract so you can draw your ribs together and force the air out of your lungs.  This is a smooth movement until you add something like heavy coughing or rapid, deep breathing.

If, for example, you are having an allergic reaction to leaves molding in the fall or you have bronchitis or a post-nasal drip, you may have bouts of uncontrolled coughing.

Or, if you are an athlete, you may be panting after a challenging workout or run.

In both cases you are rapidly opening and closing your rib cage as your body quickly draws in more air into your lungs.  This rapid and repetitive movement can cause a spasm to form in your intercostal muscles. The spasm, a tiny knot in the muscle fibers, prevents those fibers from expanding as you try to draw in your breath.  And you feel the muscle tension as a side stitch pain.

Treatment For Side Stitch Pain

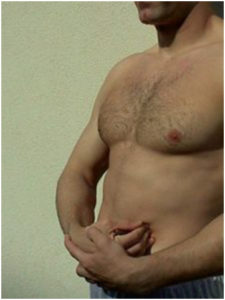
side stitch pain treatmentRelief from side stitch pain is as simple as 1,2,3. Best of all, it gives immediate pain relief so you can get on with your activities.

Step 1: Using your fingertips, press directly into the side stitch pain point. Use your opposite hand to add strength to your movement.

Step 2: Hold the point for 30 seconds and then take a slow, deep, breath so your rib cage expands fully.

Step 3: Repeat this 2-3 times.

This simple treatment stops side stitch pain as soon as it happens so you can get back to breathing easily again. It’s easy to self-treat when you have just a little direction of where to go to find the pain, and how to do a self-treatment.

You can discover how to eliminate pain quickly using my book, Treat Yourself to Pain-Free Living.     This book is a “how to guide” to the body, and will save you time and money, and most importantly, give you relief!

Wishing you well,

Julie Donnelly


About The Author

julie donnellyJulie Donnelly is a Deep Muscle Massage Therapist with 20 years of experience specializing in the treatment of chronic joint pain and sports injuries. She has worked extensively with elite athletes and patients who have been unsuccessful at finding relief through the more conventional therapies.

She has been widely published, both on – and off – line, in magazines, newsletters, and newspapers around the country. She is also often chosen to speak at national conventions, medical schools, and health facilities nationwide.

These statements have not been evaluated by the Food and Drug Administration. This information is not intended to diagnose, treat, cure or prevent any disease.

What Causes Carpal Tunnel Syndrome?

The Symptoms of Carpal Tunnel Syndrome Are Caused By Tight Muscles

Author: Julie Donnelly, LMT –The Pain Relief Expert

Editor: Dr. Steve Chaney

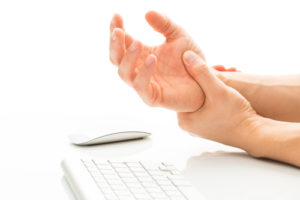
what causes carpal tunnel syndromeWhat causes carpal tunnel?

In 1997 I was diagnosed with carpal tunnel syndrome: wrist pain, tingling and numb fingers. The pain and burning was horrible, it prevented me from even picking up a pencil or holding a glass. As a massage therapist it was devastating, my hands are my livelihood! I tried everything and finally had to close down my therapy practice because the pain was so severe. I knew I wasn’t going to go for surgery, but carpal tunnel syndrome was a hurdle that was pushing me out of work and I didn’t know where to turn.

Finally, I started to think of the logic of the body.  While everyone was looking at my wrist and forearm, the median nerve that causes the symptoms of carpal tunnel syndrome doesn’t start in my arm, but where does it start?  Research showed that the nerve actually starts in your NECK!  Who would have thought this would be what causes carpal tunnel!

I found the solution to my problem, and I’ve been bringing it to people worldwide ever since.

How Muscles in Your Neck Can Be What Causes Carpal Tunnel Syndrome Symptoms

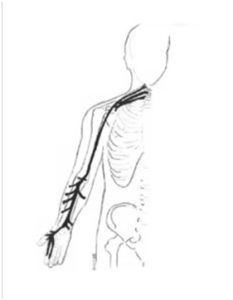
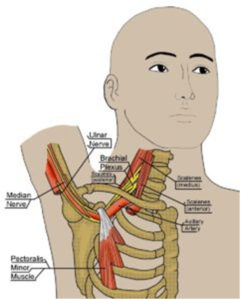
muscles cause carpal tunnel syndromeA bundle of nerves called the Brachial Plexus  (see three lines in neck of drawing) comes out of your cervical vertebrae and at the top of your shoulder the fibers divide into three nerves:

  1.  The Median Nerve – which goes to your thumb and first two fingers
  2. The Ulnar Nerve – which goes to your ring and pinky fingers
  3.  The Radial Nerve – which goes to your wrist

Your Scalenes muscle is in front of, and in back of the brachial plexus.

When the scalenes are in spasm, they put pressure on the bundle of nerves and it can cause tingling and numbness to be felt all the way to your fingers. The purple shading shows the referred pain pattern for the scalenes spasms.  This can be what causes carpal tunnel and in my case this was the primary cause of the carpal tunnel syndrome symptoms I had in my thumb and first two fingers.

By the way, your scalenes also cause that burning feeling you get between your shoulder blades.  You are rubbing your back, but the cause of the pain is actually in your neck!

How Muscles in Your Chest and Upper Arm Can Cause the Symptoms of Carpal Tunnel Syndrome

coracoid processThe bundle of nerves goes along the front of your body and at the top of your shoulder it breaks into the three nerves (listed above) and they go under a bone called the coracoid process  (a part of your scapula/shoulder blade).

There are three muscles that attach to your coracoid process, (the biceps , pectoralis minor  , and the coracobrachialis ). When any of them are in spasm, they will pull the bone down onto the three nerves causing tingling and numbness to radiate down your arm and into your wrist &/or hand. This is one of the symptoms of carpal tunnel syndrome, yet most medical practitioners don’t consider these muscles when searching for the cause of numbness in your fingers.


Treatment for Carpal Tunnel Syndrome

A Julstro Self-Treatment That Releases Tension in Your Shoulder and Off the Nerves to Your Hand

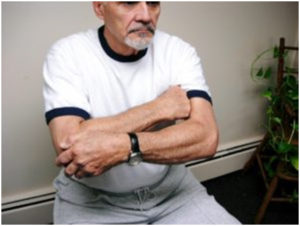
treatment for carpal tunnel syndromeYou can self-treat your upper arm muscles that are putting pressure on the coracoid AND also on your shoulder joint.

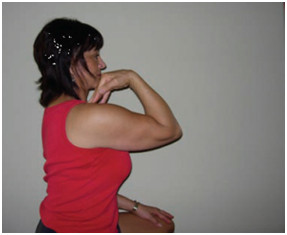
Simply make a fist and press into your biceps, using your opposite hand to help push your elbow so you can go deeper into your biceps.

Hold the pressure for 15-30 seconds and then continue the pressure while you S-L-O-W-L-Y open your arm.  Release the pressure, bend your arm, and repeat 2-3 times

End of Part 1 –

Next month I will show the muscles of your lower arm and hand and why they can be what causes carpal tunnel syndrome symptoms. Plus, you’ll get a self-treatment that is great for taking the pressure off your carpal tunnel.

Wishing you well,

Julie Donnelly


About The Author

Julie Donnelly is a Deep Muscle Massage Therapist with 20 years of experience specializing in the treatment of chronic joint pain and sports injuries. She has worked extensively with elite athletes and patients who have been unsuccessful at finding relief through the more conventional therapies.

She has been widely published, both on – and off – line, in magazines, newsletters, and newspapers around the country. She is also often chosen to speak at national conventions, medical schools, and health facilities nationwide.

These statements have not been evaluated by the Food and Drug Administration. This information is not intended to diagnose, treat, cure or prevent any disease.

Stretching Exercises For Flexibility And Pain Relief

The Pluses And Minuses Of Stretching

Author: Julie Donnelly, LMT –The Pain Relief Expert

Editor: Dr. Steve Chaney


muscle knotsWhen using stretching exercises for flexibility and pain relief, you should be careful to release the knots first.

Minuses!  Are there any minuses to stretching?  Yes, there are…let me explain.

All muscles originate on one bone, we’ll call the bone that is at the beginning of the muscle the “stationary bone,” then the muscle tendons cross over a joint and insert into another bone we’ll call the “moveable bone.”

When the muscle contracts (shortens) it pulls on the tendons, and they pull on the moveable bone where they are inserting.  This is how all joints move.

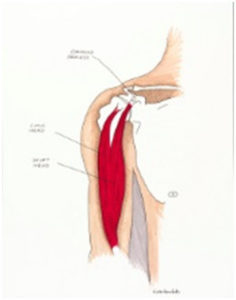
Let me demonstrate with the biceps muscle in your upper arm.  Your biceps originate in two different places:

The “long head” is deep inside your shoulder joint, and the “short head” is on a bone at the top of your shoulder called the coracoid process of your shoulder blade.

muscle painYour biceps tendon crosses over the inside of your elbow joint and inserts into the bone in your forearm.

When your biceps contract, you bend your elbow so you can touch your shoulder.

Notice that your triceps, on the back of your arm, are having to totally stretch to allow this movement.

Imagine what will happen if your triceps won’t stretch.

You won’t be able to bend your arm and your elbow will hurt.  You may decide that you need to stretch your triceps – but this is where the “minus” comes in!

The “Minus” of Stretching Exercises for Flexibility When Your Muscle is Tight

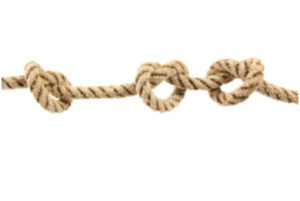
stretching exercisesWhen you repetitively use a muscle, in this case the triceps, the muscle fibers spasm and become painful, tying them into knots that are shortening the muscle fibers.  The fibers are now short, but they are still originating and inserting in the same place.  This causes a strain on the bone, usually at the insertion point.

If you had a 12″ length of rope and tied enough knots in it to make it 11″ and then consider what would happen to the rope if you tried to stretch it back to 12″ without first untying the knots.  The knots would get tighter and the fibers outside of the knots would be overstretched. This is what happens to your muscles when you stretch without first releasing the spasms.  It is the main reason you may feel worse after stretching than you did before you stretched.

Also, since the fibers are now short, they can’t lengthen enough to allow the joint to bend.  In this example, the triceps have shortened which prevents them from lengthening. You either think you need to strengthen your biceps, or you think you need to stretch your triceps.

Rarely does anyone think about first releasing the spasms, and then stretching the muscle fibers.  Yet,  this is exactly what needs to be done if you plan on using stretching exercises for flexibility and pain relief.

Release the Spasms  Preventing You From Using Stretching  Exercises Safely.

release spasmsAs I mentioned, when you try to stretch you are now causing the knots in the muscles to become more complicated, and you are overstretching the fibers on either side of the knot.

However, if you release the spasm by putting direct pressure on it, you will feel a burning sensation, but as you press and release, the burn will lessen until it totally disappears.  Now you can safely stretch for flexibility without injuring any of the muscle fibers.

The Perfect Stretching For Flexibility Packages:

Two products that will demonstrate how you can safely release the spasms and then start stretching for flexibility

The 15 Minute Back Pain Solution


Specifically written to focus on each muscle that causes back pain. THE 15 MINUTE BACK PAIN SOLUTION explains in detail why the muscles from the middle of your back to your knees will cause low back and hip pain, including sciatica and what to do to relieve the pain.  An easy-to-read eBook that has a step-by-step program you can do in 7 Days.

This is the perfect way to prepare your muscles so you can use stretching exercises for flexibility!

And

Focused Flexibility Training

back pain solutionThe comprehensive stretching program covers all aspects of releasing the spasms that have shortened the muscle fibers, and then guides you through a safe stretching routine using proven yoga-style postures.

Focused Flexibility Training has three DVDs that:

  1. Demonstrates how to do every Julstro self-applied treatment taught in Treat Yourself to Pain-Free Living.
  2. Two 30-minute yoga-style stretching programs for the upper body
  3. Two 30-minute yoga-style stretching programs for the lower body.

Both stretching programs featured in the DVDs start with a 15-minute routine of Julstro self-applied treatments to release spasms in the muscles being stretched and then continue on to the 30-minute guided stretching programs.

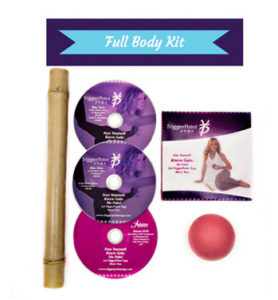
Focused Flexibility Training also comes with a Julstro Perfect Ball and a Bamboo Stick Massager to provide all the tools you’ll need to be safely stretching for flexibility.

With just a bit of time and focused attention on safely stretching, you will be able to get back to living your life without joint pain and with more flexibility than ever before – it’s easy and it feels great!

Wishing you well,

Julie Donnelly


About The Author

julie donnellyJulie Donnelly is a Deep Muscle Massage Therapist with 20 years of experience specializing in the treatment of chronic joint pain and sports injuries. She has worked extensively with elite athletes and patients who have been unsuccessful at finding relief through the more conventional therapies.

She has been widely published, both on – and off – line, in magazines, newsletters, and newspapers around the country. She is also often chosen to speak at national conventions, medical schools, and health facilities nationwide.

These statements have not been evaluated by the Food and Drug Administration. This information is not intended to diagnose, treat, cure or prevent any disease.

Health Tips From The Professor